Creating MCP Client with DeepSeek

本文主要介绍如何实现一个基于DeepSeek的MCP Client。
这个Client可以用来查询并返回网页内容、总结聊天信息并存储到本地文件,或者把网页查询的信息直接保存到本地。
这里我们会用到两个MCP server来辅助展示Client的效果:
fetch: 一个专门用于获取网页内容的MCP服务器filesystem用于本地文件系统操作的MCP服务器
你也可以集成其他MCP Server, 取决于需要完成什么样的工作流。
简介
Claude发布MCP已经有一段时间了,最近一直在结合各种编程软件和MCP server来辅助编程、分析数据和写代码。
微信公众号上看了不少写MCP概念、原理和使用的文章,总体来说各种理解都有,大多数最后都是用cursor,cline, windsurf等调用一下某个server完事。MCP server的实现也确实很简单,但是我在想,在企业真正落地大概率还是要自己去实现Client, 然后去整合agents以及各类server实现特定的业务逻辑。
如果你已经看了吴恩达DeepLearning.ai上关于MCP的系列课程:mcp-build-rich-context-ai-apps-with-anthropic,想必对MCP的原理,实现和Claude未来的规划有了一定的理解。 如果还没有看过,强烈建议去看一下,胜过99%的公众号。
这个课程最大的限制是使用Claude的API来实现MCP Client, 对于国内用户来说可操作性不强,难以加深理解,所以我写了一个基于DeepSeek的MCP Client,这个client将使用两个工具来抓取网络信息,并且保存文件到本地磁盘上面。
MCP Client Server交互逻辑
先来了解下MCP Client和Server是如何交互的:
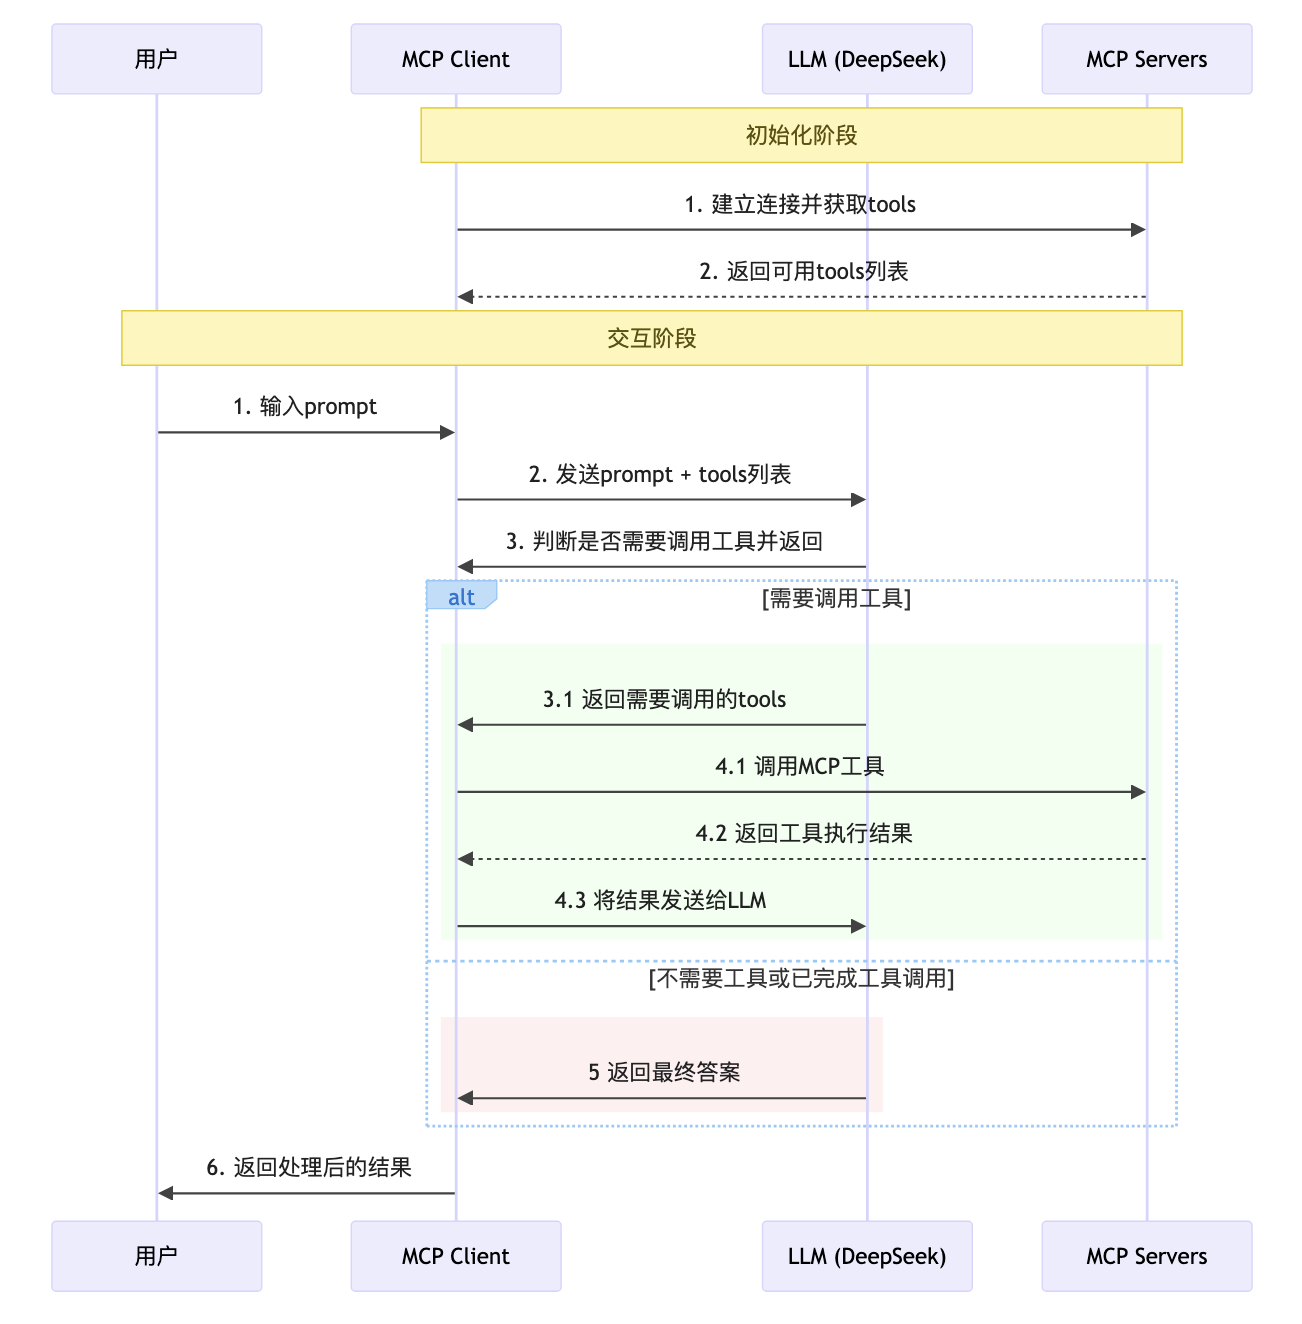
【初始化阶段】
- 【Client】解析servers.json文件,获取mcp servers的配置。
- 【Client】使用MCP提供的ClientSession与所有配置的mcp server建立连接。
- 【Client】读取每个server的tools,将其转换成适配OpenAI的function格式,存储到列表中。
【交互阶段】
- 【用户】输入prompt, 提出问题
- 【Client】将用户的prompt和tools列表一起传给LLM
- 【LLM】判断是否需要调用mcp tool, 如果不需要,则直接返回结果,如果需要,则返回tools列表
- 【Client】如果需要调用mcp tool, 则根据已经获取的tool列表,调用对应的mcp tool, 将结果返回给LLM
- 【LLM】重复步骤3-4,直到不需要调用mcp tool为止
- 【Client】将LLM的返回结果进行处理,并返回给用户
项目实践
接下来我们来实现这个MCP Client
前置工作
- 注册DeepSeek账号并获取API Key
- 安装python
- 安装uv
- 安装nodejs
创建项目
- 使用uv创建项目
# 创建项目
uv init mcp-client
cd mcp-client

# 创建虚拟环境
uv venv
source .venv/bin/activate

# 安装依赖
uv add mcp nest-asyncio openai python-dotenv

# 创建client.py
touch client.py

# 创建下载文件夹
mkdir downloads
- 设置环境变量
创建.env文件
touch .env
设置环境变量
DEEPSEEK_API_KEY=your_api_key
把.env文件添加到.gitignore文件中
echo ".env" >> .gitignore
- 在项目根目录下添加servers.json, 内容如下:
{"mcpServers":{
  "mcp_server_fetch": {
    "command": "uvx",
    "args": ["mcp-server-fetch"]
  },
  "filesystem": {
      "command": "npx",
      "args": [
        "-y",
        "@modelcontextprotocol/server-filesystem",
        "./downloads"
      ]
    }
  }
}
代码实现
先按正常的逻辑走一遍,我们需要实现:
- 运行脚本时,需要实现基础的对话功能
- 使用MCPClient来进行初始化工作
- 在MCPClient中实现基础的对话功能和资源清理工作
以下是据具体的代码实现,代码为手撸,注释使用LLM后添加,方便了解细节
1. 客户端初始化
class MCPClient:
    def __init__(self):
        self.max_loop = 10  # 防止无限循环的最大对话轮次限制
        self.messages = []  # 存储完整的对话历史,用于保持上下文
        self.exit_stack = AsyncExitStack()  # 异步资源管理器,确保所有连接正确关闭
        self.sessions: List[ClientSession] = []  # 存储所有MCP服务器会话
        self.available_tools: List[dict] = []  # 存储转换为OpenAI格式的工具列表
        self.tool_session_mapping: Dict[str, ClientSession] = {}  # 工具名称到会话的映射,用于路由工具调用
        # 初始化DeepSeek客户端,从环境变量获取API密钥
        self.client = AsyncOpenAI(api_key=os.getenv("DEEPSEEK_API_KEY"), base_url="https://api.deepseek.com")
2. 连接单个MCP服务器
async def connect_to_server(self, server_name: str, server_config: dict):
    """连接单个MCP服务器并获取其工具列表"""
    try:
        # 根据配置创建服务器参数
        server_params = StdioServerParameters(
            command=server_config["command"],  # 服务器启动命令
            args=server_config["args"],        # 命令行参数
            env=server_config.get("env"),      # 环境变量(可选)
        )

        # 通过stdio协议建立与MCP服务器的双向通信
        stdio_transport = await self.exit_stack.enter_async_context(stdio_client(server_params))
        stdio, write = stdio_transport
        # 创建客户端会话
        session = await self.exit_stack.enter_async_context(ClientSession(stdio, write))
        self.sessions.append(session)
        logger.debug(f"Connected to server: {server_name}")

        # 初始化会话,建立协议握手
        await session.initialize()

        # 获取服务器提供的工具列表
        response = await session.list_tools()
        logger.debug(f"Tool Response: {response}")

        # 将MCP工具转换为OpenAI函数调用格式
        for tool in response.tools:
            self.tool_session_mapping[tool.name] = session  # 建立工具到会话的映射
            self.available_tools.append({
                "type": "function",
                "function": {
                    "name": tool.name,
                    "description": tool.description,
                    "parameters": tool.inputSchema  # MCP的inputSchema直接兼容OpenAI的parameters格式
                }
            })

    except Exception as e:
        logger.error(f"Error connecting to server {server_name}: {str(e)}")
        raise
3. 连接所有配置的服务器
async def connect_to_servers(self):
    """从servers.json读取配置并连接所有MCP服务器"""
    try:
        # 读取服务器配置文件
        with open("servers.json", "r") as f:
            data = json.load(f)
        servers = data.get("mcpServers", {})

        # 遍历配置文件中的所有服务器,逐一建立连接
        for server_name, server_config in servers.items():
            await self.connect_to_server(server_name, server_config)

    except FileNotFoundError:
        logger.error("No servers.json file found")
        raise
    except Exception as e:
        logger.error(f"Error connecting to servers: {str(e)}")
        raise
4. 处理用户查询的核心逻辑
async def process_query(self, query: str, system_prompt: Optional[str] = None) -> None:
    """处理用户查询,实现LLM与工具调用的完整循环"""

    # 如果有系统提示词,先添加到消息历史
    if system_prompt:
        self.messages.append({"role": "system", "content": system_prompt})

    # 添加用户查询到消息历史
    self.messages.append({"role": "user", "content": query})

    # 开始LLM与工具调用的循环,最多执行max_loop次防止无限循环
    for i in range(self.max_loop):
        try:
            # 调用DeepSeek API,传入对话历史和可用工具列表
            response = await self.client.chat.completions.create(
                model="deepseek-chat",
                messages=self.messages,
                tools=self.available_tools,  # 传入所有可用的MCP工具
                tool_choice="auto"          # 让AI自动判断是否需要调用工具
            )
            logger.debug(f"Chat Completion Response: {response}")
        except Exception as e:
            logger.error(f"Error processing query: {str(e)}")
            raise

        # 获取AI的响应消息
        response_message = response.choices[0].message
        # 将AI响应添加到消息历史
        self.messages.append({
            "role": "assistant",
            "content": response_message.content,
            "tool_calls": response_message.tool_calls
        })

        # 如果AI不需要调用工具,直接输出结果并结束循环
        if not response_message.tool_calls:
            print("AI: ", response_message.content)
            break

        # AI决定调用工具,遍历所有工具调用请求
        for tool_call in response_message.tool_calls:
            tool_name = tool_call.function.name
            # 解析工具调用参数(OpenAI返回JSON字符串,需要转换为字典)
            try:
                arguments = json.loads(tool_call.function.arguments)
            except json.JSONDecodeError:
                arguments = {}
            print(f"Calling tool: [{tool_name}] with arguments: {arguments}")

            try:
                # 根据工具名称找到对应的MCP会话
                session = self.tool_session_mapping[tool_name]
                # 调用MCP工具
                mcp_result = await session.call_tool(
                    name=tool_name,
                    arguments=arguments
                )
                logger.debug(f"MCP Tool call Result: {mcp_result}")

                # 处理工具调用结果,转换为字符串格式
                if hasattr(mcp_result, 'content'):
                    if isinstance(mcp_result.content, list):
                        result_content = "\n".join([str(item) for item in mcp_result.content])
                    else:
                        result_content = str(mcp_result.content)
                else:
                    result_content = str(mcp_result)

                # 将工具调用结果添加到消息历史,供AI下一轮使用
                self.messages.append({
                    "role": "tool",
                    "name": tool_name,
                    "content": result_content,
                    "tool_call_id": tool_call.id
                })
            except Exception as e:
                # 工具调用失败时,将错误信息添加到消息历史
                error_msg = f"Error: {str(e)}"
                logger.error(error_msg)
                self.messages.append({
                    "role": "tool",
                    "name": tool_name,
                    "content": error_msg,
                    "tool_call_id": tool_call.id
                })
5. 交互式聊天循环
async def chat_loop(self):
    """运行交互式聊天循环,处理用户输入"""
    print("\nMCP Client Started!")
    print("Type 'exit' or 'quit' to quit.\n")

    while True:
        try:
            # 获取用户输入
            query = input("\nYou: ").strip()
            if query.lower() == "exit" or query.lower() == "quit":
                break  # 用户选择退出
            if not query:
                continue  # 忽略空输入

            # 调试模式下打印消息历史
            if self.messages:
                logger.debug(f"Messages[{len(self.messages)}]:")
                for message in self.messages:
                    logger.debug(message)

            # 处理用户查询
            await self.process_query(query)
        except Exception as e:
            logger.error(f"Error: {str(e)}")
6. 资源清理和程序入口
async def cleanup(self):
    """清理所有异步资源,确保连接正确关闭"""
    await self.exit_stack.aclose()

async def main():
    """程序主入口,管理整个生命周期"""
    client = MCPClient()
    try:
        # 初始化阶段:连接所有配置的MCP服务器
        await client.connect_to_servers()
        # 交互阶段:启动聊天循环
        await client.chat_loop()
    except KeyboardInterrupt:
        print("Goodbye!")
    finally:
        # 确保资源正确释放
        await client.cleanup()

if __name__ == "__main__":
    asyncio.run(main())
完整代码
import asyncio
import json
import os
import logging
from contextlib import AsyncExitStack
from typing import Optional, List, Dict

import nest_asyncio
from dotenv import load_dotenv
from mcp import ClientSession, StdioServerParameters
from mcp.client.stdio import stdio_client
from openai import AsyncOpenAI

nest_asyncio.apply()
load_dotenv()

# Configure logging with basicConfig
logging.basicConfig(
    level=os.getenv("LOG_LEVEL", "WARNING").upper(),
    format='%(asctime)s - %(name)s - %(levelname)s - %(message)s'
)
logger = logging.getLogger(__name__)

class MCPClient:
    def __init__(self):
        self.max_loop = 10
        self.messages = []
        self.exit_stack = AsyncExitStack()
        self.sessions: List[ClientSession] = []
        self.available_tools: List[dict] = []
        self.tool_session_mapping: Dict[str, ClientSession] = {}
        self.client = AsyncOpenAI(api_key=os.getenv("DEEPSEEK_API_KEY"), base_url="https://api.deepseek.com")

    async def connect_to_server(self, server_name: str, server_config: dict):
        """
        Connect to an MCP server

        Args:
            server_name: Name of the server
            server_config: Configuration for the server

        :return:
        """
        try:
            server_params = StdioServerParameters(
                command=server_config["command"],
                args=server_config["args"],  # Command line arguments
                env=server_config.get("env"),  # Optional environment variables
            )

            stdio_transport = await self.exit_stack.enter_async_context(stdio_client(server_params))
            stdio, write = stdio_transport
            session = await self.exit_stack.enter_async_context(ClientSession(stdio, write))
            self.sessions.append(session)
            logger.debug(f"Connected to server: {server_name}")

            await session.initialize()

            # list available tools
            response = await session.list_tools()
            logger.debug(f"Tool Response: {response}")
            for tool in response.tools:
                self.tool_session_mapping[tool.name] = session
                self.available_tools.append({
                    "type": "function",
                    "function": {
                        "name": tool.name,
                        "description": tool.description,
                        "parameters": tool.inputSchema
                    }
                })

        except Exception as e:
            logger.error(f"Error connecting to server {server_name}: {str(e)}")
            raise

    async def connect_to_servers(self):
        """
        Connect to multiple MCP servers
        """
        try:
            with open("servers.json", "r") as f:
                data = json.load(f)
            servers = data.get("mcpServers", {})

            for server_name, server_config in servers.items():
                await self.connect_to_server(server_name, server_config)

        except FileNotFoundError:
            logger.error("No servers.json file found")
            raise
        except Exception as e:
            logger.error(f"Error connecting to servers: {str(e)}")
            raise

    async def process_query(self, query: str, system_prompt: Optional[str] = None) -> None:
        """
        Process a query using DeepSeek and available MCP tools

        :param query: The query user wants to process
        :param system_prompt: Optional system prompt
        :return:
        """

        if system_prompt:
            self.messages.append({"role": "system", "content": system_prompt})

        self.messages.append({"role": "user", "content": query})

        for i in range(self.max_loop):
            try:
                response = await self.client.chat.completions.create(
                    model="deepseek-chat",
                    messages=self.messages,
                    tools=self.available_tools,
                    tool_choice="auto"
                )
                logger.debug(f"Chat Completion Response: {response}")
            except Exception as e:
                logger.error(f"Error processing query: {str(e)}")
                raise

            response_message = response.choices[0].message
            self.messages.append({
                "role": "assistant",
                "content": response_message.content,
                "tool_calls": response_message.tool_calls
            })

            if not response_message.tool_calls:
                print("AI: ", response_message.content)
                break

            # If deepseek determines that it needs to call a tool
            for tool_call in response_message.tool_calls:
                tool_name = tool_call.function.name
                # for openai tools, arguments is a json string, mcp expects a dict
                try:
                    arguments = json.loads(tool_call.function.arguments)
                except json.JSONDecodeError:
                    arguments = {}
                print(f"Calling tool: [{tool_name}] with arguments: {arguments}")

                try:
                    session = self.tool_session_mapping[tool_name]
                    mcp_result = await session.call_tool(
                        name=tool_name,
                        arguments=arguments
                    )
                    logger.debug(f"MCP Tool call Result: {mcp_result}")
                    if hasattr(mcp_result, 'content'):
                        if isinstance(mcp_result.content, list):
                            result_content = "\n".join([str(item) for item in mcp_result.content])
                        else:
                            result_content = str(mcp_result.content)
                    else:
                        result_content = str(mcp_result)

                    self.messages.append({
                        "role": "tool",
                        "name": tool_name,
                        "content": result_content,
                        "tool_call_id": tool_call.id
                    })
                except Exception as e:
                    error_msg = f"Error: {str(e)}"
                    logger.error(error_msg)
                    self.messages.append({
                        "role": "tool",
                        "name": tool_name,
                        "content": error_msg,
                        "tool_call_id": tool_call.id
                    })


    async def chat_loop(self):
        """
        Run an interactive chat loop
        """
        print("\nMCP Client Started!")
        print("Type 'exit' or 'quit' to quit.\n")

        while True:
            try:
                query = input("\nYou: ").strip()
                if query.lower() == "exit" or query.lower() == "quit":
                    break
                if not query:
                    continue
                if self.messages:
                    logger.debug(f"Messages[{len(self.messages)}]:")
                    for message in self.messages:
                        logger.debug(message)
                await self.process_query(query)
            except Exception as e:
                logger.error(f"Error: {str(e)}")

    async def cleanup(self):
        await self.exit_stack.aclose()


async def main():
    client = MCPClient()
    try:
        await client.connect_to_servers()
        await client.chat_loop()
    except KeyboardInterrupt:
        print("Goodbye!")
    finally:
        await client.cleanup()


if __name__ == "__main__":
    asyncio.run(main())
效果演示
先运行脚本:
python client.py
假如我今天想要了解一下uv命令怎么使用,那么可以这么提问:
tell me how to use uv to manage python packages from the official documentation and save it as a markdown file
结果是这样的:
MCP Client Started!
Type 'exit' or 'quit' to quit.

You: tell me how to use uv to manage python packages from the official documentation and save it as a markdown file

Calling tool: [fetch] with arguments: {'url': 'https://pypi.org/project/uv/', 'max_length': 5000}
Calling tool: [fetch] with arguments: {'url': 'https://docs.astral.sh/uv/', 'max_length': 5000}
Calling tool: [fetch] with arguments: {'url': 'https://docs.astral.sh/uv/', 'start_index': 5000, 'max_length': 5000}
Calling tool: [write_file] with arguments: {'path': 'uv_package_management.md', 'content': '# Using `uv` to Manage Python Packages\n\n`uv` is an extremely fast Python package and project manager written in Rust. It aims to replace tools like `pip`, `pip-tools`, `pipx`, `poetry`, `pyenv`, `twine`, and `virtualenv` with a single, efficient tool.\n\n## Installation\n\nYou can install `uv` using the official standalone installer or via `pip`:\n\n### Standalone Installer\n\n**macOS and Linux:**\n```bash\ncurl -LsSf https://astral.sh/uv/install.sh | sh\n```\n\n**Windows:**\n```powershell\npowershell -ExecutionPolicy ByPass -c "irm https://astral.sh/uv/install.ps1 | iex"\n```\n\n### Via `pip`\n```bash\npip install uv\n```\n\n### Via `pipx`\n```bash\npipx install uv\n```\n\nAfter installation, you can update `uv` itself:\n```bash\nuv self update\n```\n\n## Features\n\n### Projects\n\n`uv` manages project dependencies and environments, similar to `rye` or `poetry`:\n\n```bash\nuv init example\ncd example\nuv add ruff\nuv run ruff check\nuv lock\nuv sync\n```\n\n### Scripts\n\n`uv` can manage dependencies for single-file scripts with inline metadata:\n\n```bash\necho \'import requests; print(requests.get("https://astral.sh"))\' > example.py\nuv add --script example.py requests\nuv run example.py\n```\n\n### Tools\n\n`uv` can execute and install command-line tools provided by Python packages, similar to `pipx`:\n\n```bash\nuvx pycowsay \'hello world!\'\nuv tool install ruff\n```\n\n### Python Versions\n\n`uv` can install and manage Python versions:\n\n```bash\nuv python install 3.10 3.11 3.12\nuv venv --python 3.12.0\nuv python pin 3.11\n```\n\n### The `pip` Interface\n\n`uv` provides a drop-in replacement for common `pip`, `pip-tools`, and `virtualenv` commands:\n\n```bash\nuv pip compile docs/requirements.in --universal --output-file docs/requirements.txt\nuv venv\nuv pip sync docs/requirements.txt\n```\n\n## Learn More\n\nFor detailed documentation, visit [docs.astral.sh/uv](https://docs.astral.sh/uv).\n\nYou can also explore the [first steps](https://docs.astral.sh/uv/getting-started/first-steps/) or jump straight to the [guides](https://docs.astral.sh/uv/guides/).'}
Calling tool: [list_allowed_directories] with arguments: {}
Calling tool: [write_file] with arguments: {'path': '/Users/loong_zhou/mcp/test-mcp/mcp_demo/client/downloads/uv_package_management.md', 'content': '# Using `uv` to Manage Python Packages\n\n`uv` is an extremely fast Python package and project manager written in Rust. It aims to replace tools like `pip`, `pip-tools`, `pipx`, `poetry`, `pyenv`, `twine`, and `virtualenv` with a single, efficient tool.\n\n## Installation\n\nYou can install `uv` using the official standalone installer or via `pip`:\n\n### Standalone Installer\n\n**macOS and Linux:**\n```bash\ncurl -LsSf https://astral.sh/uv/install.sh | sh\n```\n\n**Windows:**\n```powershell\npowershell -ExecutionPolicy ByPass -c "irm https://astral.sh/uv/install.ps1 | iex"\n```\n\n### Via `pip`\n```bash\npip install uv\n```\n\n### Via `pipx`\n```bash\npipx install uv\n```\n\nAfter installation, you can update `uv` itself:\n```bash\nuv self update\n```\n\n## Features\n\n### Projects\n\n`uv` manages project dependencies and environments, similar to `rye` or `poetry`:\n\n```bash\nuv init example\ncd example\nuv add ruff\nuv run ruff check\nuv lock\nuv sync\n```\n\n### Scripts\n\n`uv` can manage dependencies for single-file scripts with inline metadata:\n\n```bash\necho \'import requests; print(requests.get("https://astral.sh"))\' > example.py\nuv add --script example.py requests\nuv run example.py\n```\n\n### Tools\n\n`uv` can execute and install command-line tools provided by Python packages, similar to `pipx`:\n\n```bash\nuvx pycowsay \'hello world!\'\nuv tool install ruff\n```\n\n### Python Versions\n\n`uv` can install and manage Python versions:\n\n```bash\nuv python install 3.10 3.11 3.12\nuv venv --python 3.12.0\nuv python pin 3.11\n```\n\n### The `pip` Interface\n\n`uv` provides a drop-in replacement for common `pip`, `pip-tools`, and `virtualenv` commands:\n\n```bash\nuv pip compile docs/requirements.in --universal --output-file docs/requirements.txt\nuv venv\nuv pip sync docs/requirements.txt\n```\n\n## Learn More\n\nFor detailed documentation, visit [docs.astral.sh/uv](https://docs.astral.sh/uv).\n\nYou can also explore the [first steps](https://docs.astral.sh/uv/getting-started/first-steps/) or jump straight to the [guides](https://docs.astral.sh/uv/guides/).'}
AI:  I have successfully created a markdown file titled `uv_package_management.md` that explains how to use `uv` to manage Python packages. The file is saved in the `/Users/loong_zhou/mcp/test-mcp/mcp_demo/client/downloads/` directory.

You can now access the file at the specified location for reference or further editing. Let me know if you need any additional assistance!
可以看到这边调用了三次 fetch ,一次 list_allowed_directories 和两次 write_file,最终生成了markdown文件到downloads目录下,并返回信息给我。
以后想要学习什么新知识,就可以直接让它来辅助读取网页,并且总结后生成文档啦。
One More Thing
你也许会好奇在这个client的运行中,发生了哪些交互,不妨使用以下命令来了解调用细节:
LOG_LEVEL=debug python client.py
总结
今天我们学习了如何使用DeepSeek作为LLM来创建一个MCP客户端,希望对你有帮助。后续我会分享一些有意思的MCP Server,看看我日常是如何整合一些数据做分析的。
如果你觉得这篇文章对你有帮助,欢迎点赞收藏,感谢支持!